


I remember the first time I noticed a peel on my kitchen cabinets. A small corner of the laminate had lifted. It bugged me every time I saw it. But rather than stressing over it, I decided to fix it myself. With a few simple tools, I managed to restore the cabinet to its original look. In this guide, I’ll show you how to fix peeling laminate cabinets step by step. Whether it’s a tiny chip or a larger area, I’ve got a solution for you. You don’t need to hire someone. By the end, you’ll know exactly what to do.
What Causes Laminate Cabinets to Peel?
Laminate cabinets peel for a few common reasons. One reason is age. Over time, the adhesive holding weakens. This causes the laminate to lift, especially on the edges.
Moisture is another factor. Kitchens and bathrooms have high humidity, which can loosen the adhesive. Water splashes can lead to peeling, especially around the sink.
Heat also contributes to peeling. Cabinets near stoves or ovens are exposed to heat, which can weaken the bond. This makes it more likely to peel away.
High-use areas like cabinet edges often peel first. These spots experience the most wear and tear. It’s no surprise that they start to lift over time.
Gather Your Tools and Materials
Before you start, make sure you have everything you need. For this project, you’ll need:
- Adhesive: A strong glue designed for laminate surfaces.
- Putty knife: To press the laminate back into place.
- Sandpaper: For smoothing rough edges.
- Laminate patch (if necessary): To cover large, damaged areas.
Each of these tools will help you restore your cabinets without a hitch. I’ve used them all myself, and they make the job much easier.
01. Clean the Surface

Your fix will go much more smoothly if you have a clean surface to proceed. The first thing you need to do is to clean the peeling area with a damp cloth, getting rid of all layers of dirt and dust. Try a mild cleaner that is safe for the laminate but will get rid of grime. This is to ensure better bonding of the adhesive and to make the repair last.
02. Apply Adhesive
Now, It’s time to apply the adhesive. Use a small amount, And spread it evenly over the back of the laminate or the exposed surface. Be careful not to use too much glue, as it could squeeze out during pressing. You want a neat finish, not a sticky mess!
03. Smooth the Laminate
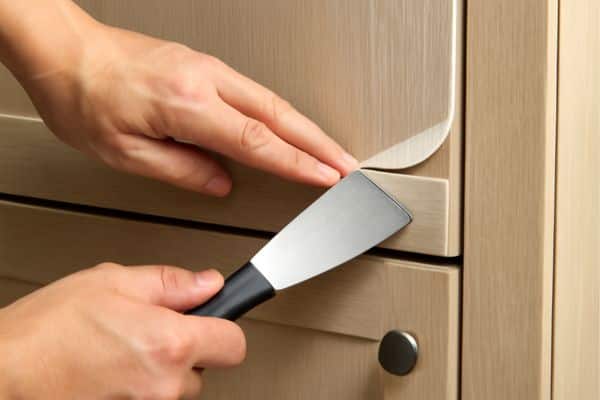
Next, Gently press the laminate back into place. Use a putty knife to smooth out air bubbles or uneven spots. I’ve found that using a rolling pin or a flat object can help, too. The goal is to create a smooth, tight bond between the surface and the surface.
04. Trim the Excess Laminate (if needed)
Once the laminate is securely in place, you may need to trim any excess. A utility knife works best for this task. It’s important to do this carefully, so the edges look clean and neat. It’s all about precision here for that professional finish!
05. Allow the Laminate to Dry

Let the adhesive set before moving on. Most adhesives will need a few hours to dry fully. I recommend waiting at least 4-6 hours, or overnight, to ensure the bond is strong and long-lasting. Trust me, this waiting time is worth it.
06. Final Touches
Once the laminate is dry, check for any rough edges or spots that need touch-ups. You can use a bit of paint or clear sealant to finish it off. Adding a clear coat not only helps with durability but also gives your cabinet a polished, fresh look. If you’re interested in maximising your kitchen space, a tall kitchen cabinet can be a great addition for extra storage.
How to Repair Chipped Laminate Cabinets

Chipped laminate is different from peeling. Chipping occurs when a small piece of the laminate breaks off. Peeling happens when the layer separates from the surface. Both problems are easy to fix.
To repair a chip, follow these steps:
- Clean the Area: Wipe the chipped area with a soft cloth to remove dust.
- Apply Filler: Use a laminate repair kit. Fill the chip with the matching filler. Press the filler into the chip until it is level.
- Smooth the Filler: Once filled, smooth the surface with a putty knife or your finger. Make sure it is even with the surroundings.
- Let It Dry: Allow the filler to dry according to the kit’s instructions.
- Sand and Finish: Gently sand the area once dry. This helps blend the repair with the rest of the cabinet. You can also touch up with paint if needed.
Practical Tips for a Professional Finish
To make your repair look flawless, here are some simple tips:
- Match the Colour: Choose a filler or patch that closely matches the paint on your cabinet. This will help the repair blend in seamlessly and look natural.
- Be Patient: Take your time. Don’t rush the process. Allow each step to fully set and dry for the best results.
- Blend the Repair: After the filler is dry, lightly sand the edges. This smooths out the repair and makes it almost invisible. A clear sealant can help create a uniform finish.
When Should You Call a Professional?

Sometimes, DIY fixes just won’t cut it. For large areas of damage or if the laminate is beyond repair, you may need a professional. This is especially true for deep chips, Cracks, Or extensive peeling.
To decide, look at the size and location of the damage. Small, Isolated spots are usually easy to fix. But, if the damage covers a large section or is hard to reach, it might be time for professional help.
In my experience, it’s worth hiring A professional when the damage is too much for a quick fix. They can ensure A more permanent solution and save you the hassle of repeating repairs.
Conclusion
Fixing peeling and chipped cabinet laminate is a popular weekend warrior project. You can make your cabinets look like new with the right tools and a little patience. It’s a cheap way of making your space feel better without spending much money. You should try it too! And not only will you save money, you’ll feel good about being able to repair the washer on your own.