

I first added LED strip lights to my room for a touch of ambience. The light was perfect, but the strips themselves didn’t look great on the ceiling. They stuck out and didn’t blend in. I quickly realised that to get the clean, Seamless look I wanted, I needed to figure out how to hide LED strip lights on the ceiling. In this guide, I’ll share simple steps to help you hide your LED strips, Making your space look polished and modern. Let’s get started!
Why Hide LED Strip Lights?
Improved Aesthetics:
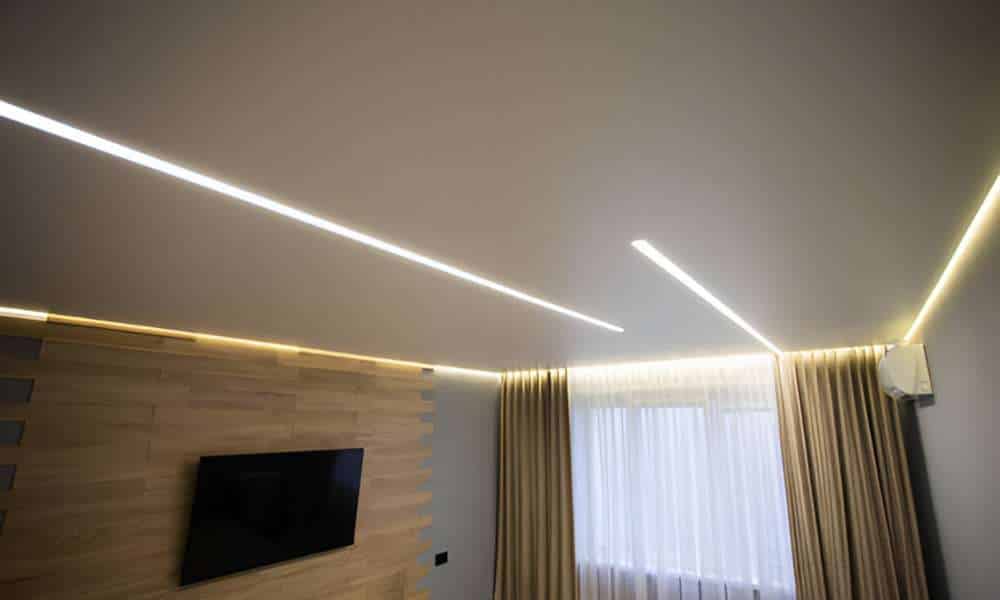
I first set up an LED strip, which added great light. But they were visible, and they didn’t blend well with the room. Hiding made the space look smoother. It created a clean, polished effect. The lights became the focus, not the hardware.
Enhanced Lighting Effect:
Hiding the LED strips softens. When exposed, the light can be too harsh. But when hidden, the light spreads evenly. It creates a calm, cosy atmosphere. This gentle music is perfect for relaxing.
Perfect for Different Room Styles:
Hidden LED strips fit any style. In a modern room, they add sleekness. In a cosy space, they give warmth. It makes the lighting blend with the room. It works with any design. Explore small bedroom lighting ideas to create a cozy yet stylish space.
01. Choose the Right LED Strips
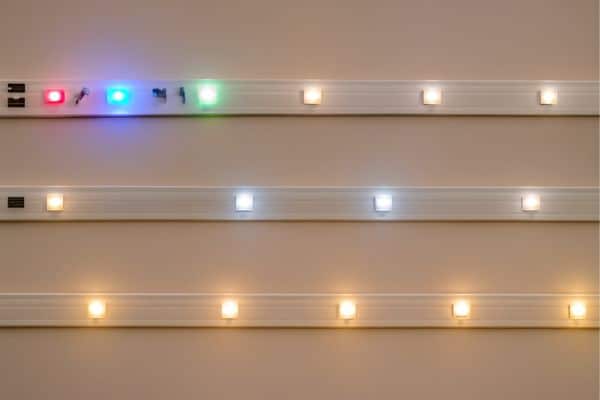
The first consideration when it comes to hiding LED strip lighting is the type of LED. There are several options to choose from – everything from RGB strips, which will change colours at the tap of a remote, to warm white, for a classic, cosy feel. If you want something subtle, go for warm white. These will look good in a vibrant and animated environment, like entertainment premises or an event situation. It is important to take into account what your space requires before you select the type of one. The perfect LED will match your room’s mood and decor, while remaining covert and highly useful.
02. Measure and Plan
With your LED strips in hand, it’s time to measure and plan where you want to place them. It is important to do this to help produce an even, symmetrical lighting effect. Measure the length of the space you want to install your ceiling. You can position them on the edges or in the middle, but ensure the strips will be concealed, and yet light the place. Some planning ahead of time can allow you to get the most out of your installation and avoid any disappointed placement later on.
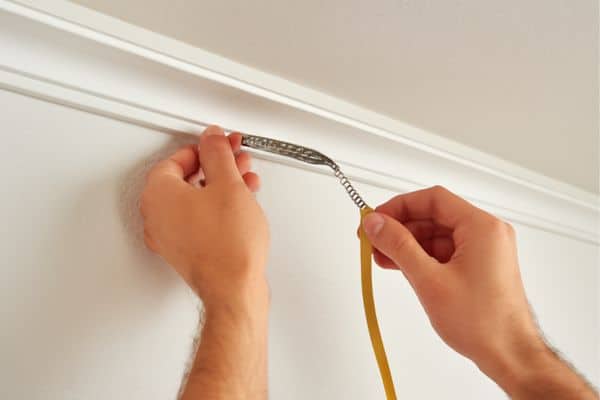
03. Create a Concealment Space
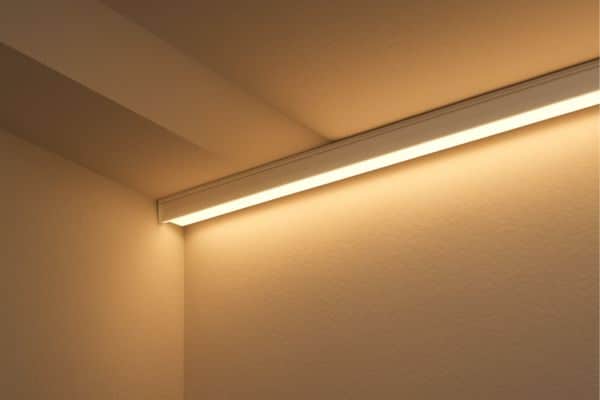
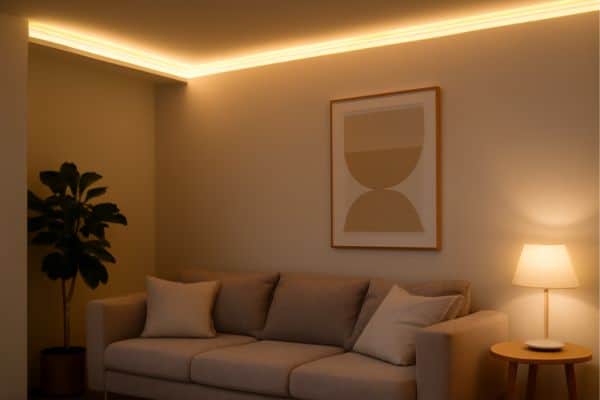
So, let me show you how to hide LED strips. One straightforward solution to achieve this is by employing hidden channels. Horizontal Blinds That Stop Glare Light Slopers. These are plastic or aluminium strips that fit across the top of the LEDS, allowing the light to come through. If you want something even more integrated-looking, they say to try recessed grooves or crown moulding. These are going to form a concealed, clean space for you to sit in and for the water to pour out naturally. The point is to conceal the hardware while allowing the light to shimmer through.
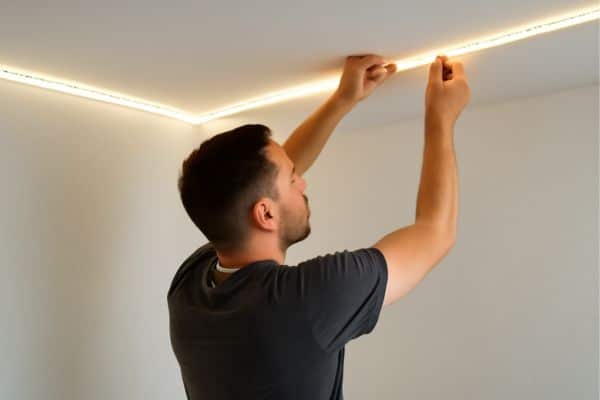
04. Install the LED Strips
This is the fun part! Installing the LED strips is relatively simple. First, peel off the adhesive backing on the and carefully stick them into the concealed area you’ve prepared. If you’re using a channel, press the LED into the track and close the cover. For recessed grooves or moulding, make sure the strip is secure and that the power connection is easy to access. Once installed, connect the power source. Don’t forget to test the lights before securing everything in place!
05. Test and Adjust
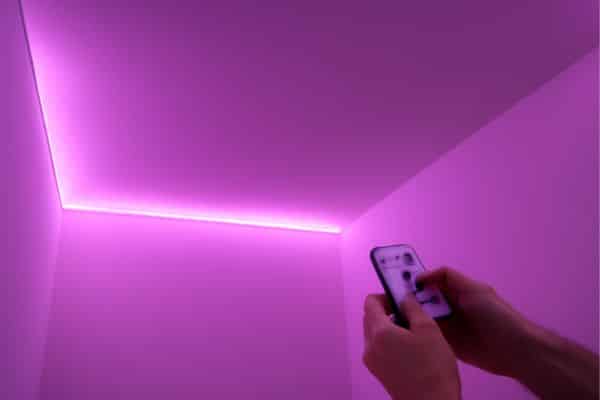
Once everything is installed, it’s time to test. Turn on your LED and adjust the brightness if needed. Make sure the light is spread evenly across the ceiling. Check from different angles to ensure that the isn’t too harsh or dim in certain areas. You might need to reposition the strips slightly or adjust the brightness settings for the perfect effect. The key is making sure your ceiling provides the right ambience for the room.
Practical Tips for Hiding LED Strip Lights
Use a Dimmer Switch:
One of the simplest ways to upgrade your LED setup is to install a dimmer switch. This enables you to set the brightness according to your requirements. Whether you are hosting a large dinner party or a small, intimate gathering, dimming allows you to create the perfect atmosphere and is only limited by your imagination. It’s easy on the eyes but adds a huge impact in the way space feels. Remove LED strip lights from the wall to make adjustments without damaging your surfaces.
Placement Tips:
The position of your LED strips is very important for getting the best possible look. Try putting them in corners or up against walls to give your space some nice, soft indirect light. Another neat trick is to conceal the strips around furniture — this allows the light to peak out subtly, setting the mood in the room without being in your face. Experiment with the dimensions to determine where it fits and what works best for your area and the look you want.
Keep It Neat:
Good cable management is necessary for LED. After spending all that money on new equipment, the last thing you need is unsightly cables cluttering up your otherwise-fresh setup. Clean Up Cable clips or channels will help keep everything neat and out of sight. A tidy installation not only looks better, but also prolongs the life of your lights because you won’t be stressing the wires.
Common Mistakes to Avoid When Installing Ceiling LED Strips
Incorrect Measurement:
One of the most frequent mistakes when installing LED strips is bad measuring. If you don’t measure space correctly, then you will probably find that your LED might look uneven or out of place. If you spend the time to measure the space that you want to place them, then they will fall perfectly within that space, providing a visually weightless effect throughout your room. It may seem like a simple thing, but let me tell you, it is everything.
Overexposing Strips:
Another mistake is leaving the LED strips exposed. While the light can be beautiful, the strips themselves can look out of place if not concealed properly. Make sure you install in a way that hides them from view, but still allows the to shine through. This creates a clean, polished look without the visible hardware, giving your room a more refined feel.
Skipping the Power Setup:
It’s so easy to be distracted by how good your LED looks that you forget fundamental set-up steps, such as connecting the power. Loosely connected power can lead to problems in the future with flickering and intermittent light. Verify your power source and cabling to make a fast connection before you complete your installation. A good power supply guarantees your work will be flawless each time.
When to Use LED Strip Lights on the Ceiling
Creating Ambient Lighting in Living Rooms:
Living room ambient lighting with LED strip lights. They offer soft, dim lighting that creates a cozy ambience. If you’re reading or watching TV, The won’t be too loud. Attach the strips around the edge of the ceiling to achieve a cosy, ambient glow that isn’t too much for the room.
Highlighting Features in Kitchens or Bathrooms:
In kitchens and bathrooms, it can highlight important features like countertops, mirrors, or shelves. They add a modern touch and emphasise details you want to showcase. The light is soft yet effective, making it perfect for areas with special features.
Conclusion
Hiding LED strip lights is an easy way to improve your room’s look. By keeping the strips hidden, you create a clean, polished space. The process is simple and can change the feel of any room in no time.
Now that you know how to hide, I encourage you to give it a try. Your space will look better, and you’ll enjoy the soft, ambient lighting. Go ahead and install with confidence!